Showing posts with label fall. Show all posts

Sunday, October 30, 2011

2011 Costume How To...Pulp Fiction, Zombie and Power Ranger

Our 2011 family costumes and how we made them...here they are:


Luckily, Maeve opted for a store-bought Red Power Ranger Samurai.  Saved me lots of time and effort!  So, I could devote more time to our costumes (see below for more details) and to Ethan's homemade zombie get up.
  

I started with a black suit jacket.  It was next to impossible to find a boys size 8 at the Goodwill.  So I grabbed a women's size 4 with plans to alter it to fit.  It was $3.59.  


I took it home and went to work resizing.  I basically undid the collar and took it in a couple inches down the back.  The good news, it's a zombie costume, so it's supposed to be torn and worn, so I rough-sewed the collar back on.  Then went to ripping holes in it!  I got a pack of 'scary cloth' at the Dollar Tree and sewed it on around the bottom and pulled it through some of the holes. It didn't look worn enough so I grabbed some sand paper and rubbed in some holes.


Add some black pants (worn to a wedding), black tennis shoes, the white button-down I wore with my costume (see below), the black tie from dad's Beetlejuice costume, white hair paint, and some $1.97 zombie face paint and you're set!


Maeve wanted to wear Ethan's ski mask with her costume...so be it!


As for Josh and I, we took a trip back to 1994 and channeled Mrs. Mia Wallace and Vincent Vega from Pulp Fiction.  Specifically, post-overdose, hence the bloody nose and syringe in the chest.
   
If you're familiar with the movie, you'd know that Vincent and Mia ate at a 50's diner called Jack Rabbit Slim's.  It was there that they participated in a dance contest and came away with a trophy (that looks a bit like the one below)!  Yep, Josh had it made at the local trophy shop.  Nice touch.  


One of me at the party:

Vincent's hair and side burns up close. You can see where I cut the wig back to create the hairline.  Then we put it back in a pony tail and tucked the loose strands behind his ears.  There was a space between the wig and burns so I "painted" his hair with my black mascara to blend it in.


Here's a close-up of the syringe in my heart.  After several experiments, we found the best option:  Cut an oval out of the side of a disposable tupperware container to use as the base.  Drill a hole through the center.  Insert a nail (we used a roofing nail b/c it has a large flat head) through the hole.  Place the syringe on the nail.  It should be a snug fit.  You might have to tap gently to get it all the way on.  Then use Spirit Gum to adhere it to your chest.  Make sure you put it on the correct side.  ;)


Costume Recap:

  • Mia
    • 'pageboy' wig (trimmed about an inch off the bangs) bought at a local pop-up Halloween store ($16)
    • fake eyelashes ($1 at Target - ELF brand)
    • white button down, black capris, black tank (all from my closet)
    • black flats ($6 on clearance)
    • make up I already had (and help from a couple You Tube videos)
    • syringe (you could use a child medicine dose syringe from the pharmacy).  
    • trial and error to get the syringe to look right and stick out...let's just say it's good we planned ahead and started getting ready at noon for a 7pm party!
  • Vincent
    • $3.59 black suit jacket from Goodwill
    • 'Michael Jackson' wig from a local party store ($15.99) that I altered to have a John Travolta widow's peak hairline. 
    • bolo tie ($2.99) from the cowboy section at a local party store.
    • side burns ($2.99) cut from an Abe Lincoln beard b/c they didn't have any side burns!!!! 
    • white button down, black pants, and dress shoes (from his closet)
    • fake earring ($1.99 for a pack of 8)

The party was so much fun.  We didn't come home with a best costume victory...we better try harder next year...we have less than a year to prepare!  ha!
Todays Creative Blog

Tuesday, October 25, 2011

Spooky Food Potluck - Great ideas!

I work with some of the most creative people!  We had a 'Spooktacular' Potluck and I was so impressed with the spooky food that was 'created'! (and this scary sign to set the tone). 
did you notice the hand with the severed fingers in the lower left?  gross...and awesome!


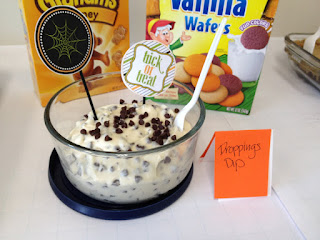
Tip: For your scary foods, be sure to come up with a gruesome descriptive name and make a sign to put out with your dish.  


"Digit Dip"
source

"Graveyard 7-Layer Dip"

"Droppings Dip"

"Blood and Phlegm"

"Goblin Eyeballs (rolled in dirt)"

"Jack-o-Lantern Potatoes"

"DEVIL-ed eggs"


Have fun this Halloween making spooky food for your family and friends!

Sunday, October 23, 2011

Carve, Paint, Carve and Paint..

It's pumpkin decorating time!  And just in the knick of time...Grandma (and Grandpa) from Minnesota came to town with a car full of pumpkins from her garden!  Including some of my favorite...white pumpkins and green 'cinderella' (i.e. short and squat) pumpkins. 


Let the decorating commence!


Dad's t-shirts make great paint shirts for the kids!
That's his concentration face. 
Self-portrait pumpkin.  
Mr. Weak Stomach almost yarfed shortly after this pic was snapped!
The "guts" bucket.
My attempt at a houndstooth pumpkin.  Free hand sketched with a ball point pen, then filled in with craft paint.  I should have cut a stencil on my Silhouette, but was feeling lazy!

Fast-forward several hours...to "dark time" (a Maeve-ism).

Maeve's pumpkin all lit up. 
Ethan's vampire pumpkin complete with scrap fabric for a cape.
The vampire looks scared!!
My father-in-law didn't like the photo of him in my previous post; I hope he likes this one.  
Todays Creative Blog

Sunday, August 28, 2011

candy corn and scarecrows [a craft how-to]

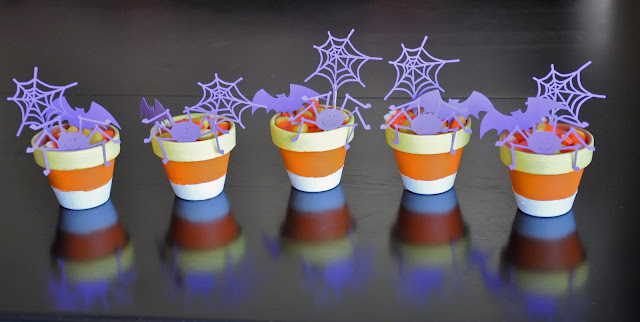
grandma r. came to town this weekend with our nieces and brought two fall crafts for the kids:  candy corn pots and can scarecrows (edited: source here)!  and they are so easy to make, too!  the kids loved it!


the candy corn pots don't really need a tutorial.  paint, fill with candy, adorn with a handmade pick (if you want).  


but here are a few tips:

  1. wrap a rubber band around the pot between the bottom (white) and the middle (orange) sections.
  2. use the lip of the pot for the line between the middle and the top (yellow) section.
  3. paint the top (yellow) and the bottom (white) sections first.  let them dry. 
  4. carefully fold down the rubber band over the top edge of the bottom (white) section to create the guide for your orange paint.

i made the picks from free basic clip art loaded into my silhouette sd.  and just hot glued them onto toothpicks.


for the scarecrows, start with an empty, clean LARGE (family size) can.  these were bush's baked beans cans. 


  • cover sides of can with light brown felt. secure with tacky glue.
  • glue on buttons for eyes, felt nose, and string mouth.


  • glue on raffia for hair (with hot glue). we used another unopened can to hold the hair in place while the glue dried.  you could use hot glue and skip the dry time. 

  • decorate straw hat (found in the doll section of hobby lobby) with flowers or a strip of fabric for the boys (with hot glue). 
  • glue hat on (with hot glue).

these two crafts put me in the mood for fall...i can't wait for the crisp air and apple-picking!
Related Posts Plugin for WordPress, Blogger...