Sunday, April 22, 2012

Make a Ruffly Table Skirt for under $10

How to make your own ruffly table skirt for under $10!  I've had several inquiries from this post asking how I made this table skirt, so here's a quick tutorial!


I made this to use on a table for my daughter's rainbow birthday party, hence the height of the ruffles.  At the last minute, we changed plans and set this up here (covering a living room cabinet) to house the favor bags.  It worked out.


And as a bonus, because this is made completely of plastic, it's weather-ready for outdoor events and easily wiped down (or hosed down in the back yard!).  You could even hang it up in the shower for it's original purpose after the party was over...hmmm...why not? 


On to the tutorial.  


Your supply list:

  1. 54"x102" plastic table covers in your color scheme ($.97 at Walmart) for the ruffles
  2. One white vinyl shower curtain (mine was 70"x72" - bought at Walmart for $2.38) or you can use a flat bed sheet, an existing table cloth, or a curtain panel.  My first thought was to use a white plastic table cover, but I'm afraid it's too thin and will tear and bunch up when sewing on the ruffles.
  3. Sewing machine + thread
  4. Scissors + ruler
First, make a plan.
  
Width of ruffled section
My supply list calls for a shower curtain that is only 70" wide.  If your table is wider, you'll need to adjust by sewing two curtains together to achieve your desired length. 

Height of ruffled section
If you're covering a standard height table, plan to make the ruffly part about 28" to 30" to just hit the floor.  If you're covering a counter height table, plan for about 36".  Best bet?  Measure your table.  

Take your table measurement and divide that by the number of ruffly layers you desire.  So for me, I took 30" (table height) divided by 6 (colored ruffle sections) to get 5".  
Now, add a couple inches for overlap and error (5" + 2" = 7") and you have your measurement to cut your strips.

Measure and mark your shower curtain where you intend to sew (every 5" in my example) from the bottom, up.  I didn't do this step and you can see my ruffles start heading uphill on the right.  Don't do as I did...  :)    

Cutting the strips

I cut my strips on the long edge of the plastic table covers, so they were 7" x 102".  Cut three strips for each ruffle. So, for my 6 ruffles, I cut 18 strips.  Each ruffle will require about 2.5 strips to cover the 70" width of the shower curtain.  


Making the strips ruffly


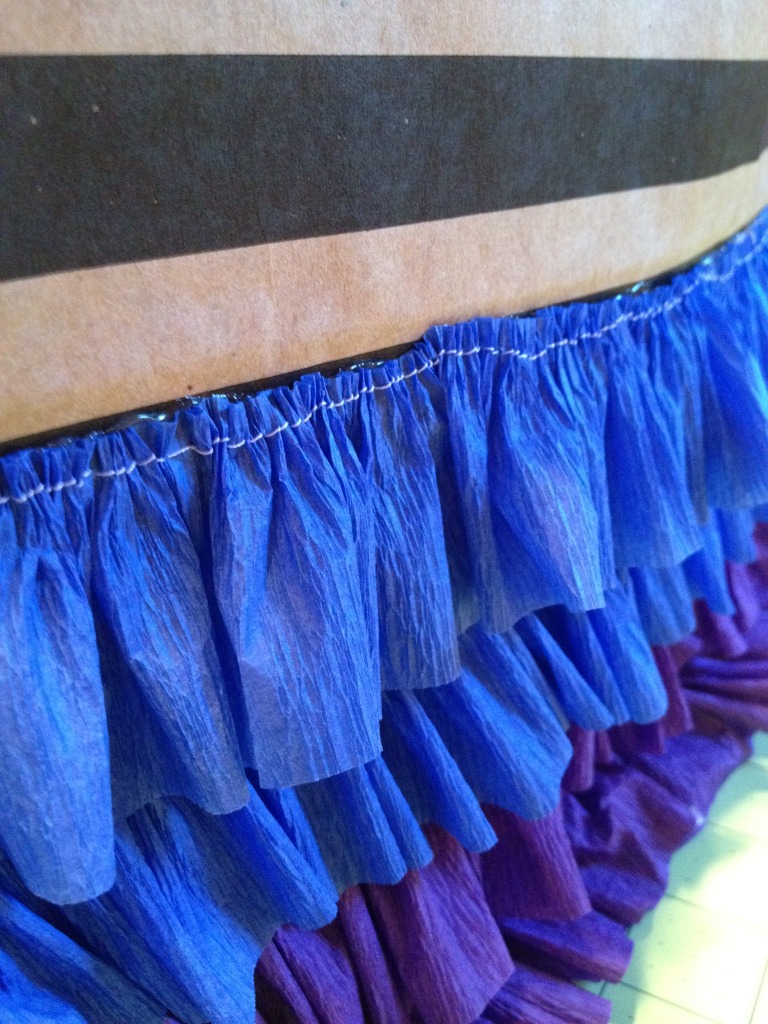
Enter sewing machine.  Set your stitch length to the longest possible.  Adjust tension to achieve the ruffle you like.  Run each strip through your machine with about a half inch seam allowance.  I noticed each strip ruffled up a bit differently, but don't be alarmed, you won't notice once it's all assembled.


Assembling the skirt  


Start from the bottom and work your way up.  So for me, that was the purple ruffle. It is not difficult to sew it up, rather it is a bit unwieldy.  Make sure you have plenty of room around and behind your machine.  You'll need it.  As you add more ruffles, you'll have to roll up the excess to help guide it through your machine.  Take your time and adjust as you go along.   


Then hang it up and admire your work.  You can really see my uphill to the right in this pic.  Take the extra 5 minutes and mark some lines on your shower curtain to avoid this rookie mistake.  ;)


A cheap, but very high-impact, party decoration for less than $10.  And I had plenty of strips left over to make a coordinating poof to decorate the front door!


Let me know if you have any questions!

Pin It

linking here.

Monday, April 9, 2012

Rainbow Party Favor Bags and Bracelets

These are so simple, they don't need a tutorial, but I wanted to share some details with you so you can make your own Rainbow Party!


Simple favor bags.  
This could be done with any color scheme, but I thought it looked like a rainbow coming out of the bag so it was perfect like this!  


Get these spools of ribbon at your local craft store for cheap!  These were from Michael's and were 3/$1.00 on sale.  I think they are normally only $.50 each.  So, my 6 colors were $2.  Can't beat that.  I already had these little handled bags, but any bag would work.  Try brown or white lunch sacks!


Use a couple inches of scotch tape, line your ribbons on the tape in the order you want, then just tape it to the inside edge of the bag.  Easy. 


Rainbow Personalized Bracelet Favors.
The bracelets were simple, too.  I purchased letter beads and multi-colored beads at our local Hobby Lobby during a 50% off sale. I already had the 'Stretch Magic bead and jewelry cord' and a needle with a large enough hole to string the elastic.  The elastic cord I had was 5mm.  Pretty sure I saw similar stuff at Wal-Mart.    


String on your beads, adding the names, or a word that goes with your party theme.  Even Ethan (almost 9 year old brother) got in on the action making himself one in purple and yellow with the word, "Vikings" (after his love for the Minnesota Vikings) and a yellow one with a Pokemon character name.  (are your kids into Pokemon?)


I sized the bracelets using Maeve's wrist as a guide.  You just don't want it to be tight.  Otherwise, these are pretty forgiving.  Knot the elastic several times over and then clip the ends about a 1/16" from your knot.  I gave it a tug before clipping the ends, just to be sure it wouldn't come undone.  


See the whole party here.  And a pinata tutorial here.

Pin It

Wednesday, April 4, 2012

Pretty Piñata on the Cheap

I'm cheap frugal.  

I will do almost anything to avoid paying full price for anything.  

And after seeing Becky of Infarrantly Creative's tutorial for a paper bag pinata, there's no way I was spending $15+ on one (that didn't match the rainbow theme, no less)!

Here's how mine came together.

  
I must give credit to Dana of MADE, because she showed me the magic that happens to crepe paper streamers when you feed them through your sewing machine!  

Now that you have ruffled your streamers, let's build!

I used a paper sack that had a handle on top so I could hang the pinata (from the swingset!).  It wasn't part of the plan, but as it turns out, the stripes on the DSW sack were very helpful in keeping my layers straight.  Bonus!


Plug in your hot glue gun. 


Start at the bottom (not on the top, like I did in the pic below -- oops!).  


You could leave it as is, or if you have extra ruffles, glue them to the bottom for added color!

Easily hung from the rings on the swing set and ready for a good smashing!  It made for a pretty sturdy pinata, given all the thread and hot glue.  I recommend candy that can't be pulverized...a pretty shower of Smarties powder sprinkled out of the pinata as it was whacked!


Disclaimer:  Buying yourself an incredibly cute pair of flats at DSW will drastically increase the cost of this project.  :)

Pin It
linking here and here.
Related Posts Plugin for WordPress, Blogger...