Saturday, May 28, 2011

re-sticky-ify your silhouette cutting mat (for free!) [a mini-tutorial]

i've been cutting a lot of fabric on my silhouette sd which leaves a fair amount of 'residue' on the cutting mat after a time.   

the replacement cutting mats are pretty spendy, so i was willing to try alternative methods.  

then i remembered those sticky hand toys i had when i was a kid.

when the hand accumulated too much gunk from sticking to too many things, a quick wash with dish soap brought it back to life.  hmmm... worth a try!
jackpot!  it worked!  it took a bit of scrubbing (gently with just my hands) and several generous squirts of dish soap, but the mat is re-sticky-ified!

you have my permission to spend the money you save with this little tip on more [insert your medium here].  mine would be fabric.  i think i'm getting addicted. 

Thursday, May 26, 2011

who won the zero7one9 wristlet?

the sew mama sew giveaway day was so much fun!  i truly appreciate those who left me some blogging advice.  fantastic suggestions!  be yourself, be yourself, be yourself was the common theme. 

i hope my personality is peeking through in my posts.  but not too much, too soon.  i don't want to scare you off with my sometimes snarky, sometimes sarcastic, personality!  i'll try to ease you into it.  ;)

on to the winner...[insert drumroll here] or [insert a ryan seacrest awkward, anxious pause here]...

the winner of her very own zero7one9 wristlet (made by these snarky, sarcastic hands) is:


jessica!  who said, "How FUN! Your stuff is so cute! Blog advice..just be nice, and funny is good too!"

congrats to jessica!  i'll be in touch with you shortly to make arrangements to send out your choice of wristlet!  i hope you *love* it!

for the rest of you...thank you so much for entering.  if you are desperately in love with the wristlet, rest assured, you can have one of your own (wink, wink)!  just visit my etsy shop and one can be on the way to you, too!

Sunday, May 22, 2011

Sew Mama Sew Giveaway Day!

it's my first-ever giveaway! me and 200+ others are giving away their handmade, creative, crafty, unique, goods for FREE via Sew Mama Sew's Giveaway Day!


to win your very own pretty gathered wristlet (your choice) from my etsy shop, zero7one9 designs, just leave me a comment below.  include your email if it's not in your profile.  i wouldn't want to pull your name and not be able to get a hold of you! 


yellow and grey, chevron and circles
 
and because i'm new to the sewing/crafting blogger scene, if you have any blog words of wisdom, mistakes to avoid, must-do's, etc., include them in your comment!


oh, and take a look around while you're here...and if you like, follow me!

comments open through May 25th, so hurry!

winner will be chosen by random drawing.

don't forget to visit all the other awesome giveaways at Sew Mama Sew!


Friday, May 20, 2011

sew mama sew - giveaway day - i'm giving!

sew mama sew hosts an annual Giveaway Day when lots of bloggers and etsy shop owners give away their goods for free!  and this year, i'm joining in on the fun! 


here's how it works.  on monday, visit sew mama sew for the list of links.  visit as many as you want. when you find something you can't live without, enter yourself in their drawing!  then cross your fingers!  

drawings will close to entries on May 25 (that only gives you 2 days to peruse and enter)!

i'll be giving away a handmade something...just have to decide what it's going to be!

stay tuned!


expressions vinyl *GIVEAWAY* at {a girl and a glue gun}

A girl and a glue gun

a girl and a glue gun (aka: agaagg) is giving away 
a gift certificate to expressions vinyl!  


run, don't walk, over and sign up for the drawing.  

is there anything better than free vinyl?  


i didn't think so. 
especially for a vinyl beginner, like me.  experimenting [read as: wasting a lot of vinyl] is an important part of learning, right?  at least i hope so.  otherwise, i'm doing something totally wrong.  :) 


Tuesday, May 17, 2011

an industrial spin on the tiered tray [a tutorial]

i am a fan of tiered trays.  i especially like them for the efficiency and space savings they offer.  which is why i have been happy to see so many fun tutorials on how to make them.  


after taking a look at several tutorials, i started thinking about how i could build one that would suit my style: simple, modern, functional.  


i took a quick stroll through the nuts and bolts aisle at Home Depot to see what i could put together.  it's not for everyone; i love it!  and here's how to make your own! 


 here's what you'll need for a two-plate serving tray:

  • 2 melamine plates (of different sizes)
  • 7 inch length of all thread (the center post) (5/16")
  • 1 eye bolt (for the handle on top) (5/16")
  • 3 nuts (5/16") i chose square nuts instead of hex
  • 3 coupling nut (couplers) (5/16" by 7/8")
  • drill 
  • hack saw
  • pliers
  • adhesive rubber bumpers (for bottom)


i don't show an eye bolt in this pic, sorry.


drill holes in your plates.  

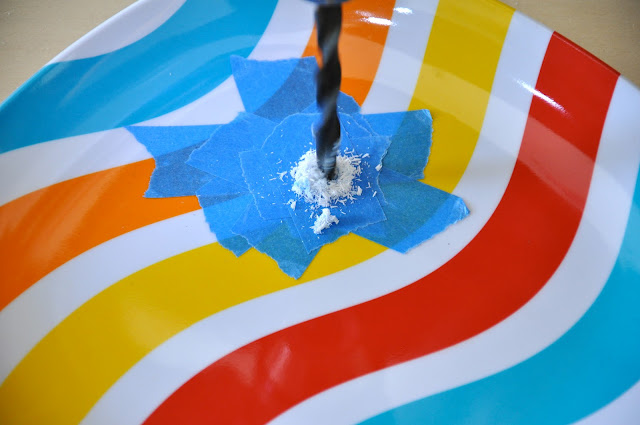
  1. first, mark the center of both plates.  to do this, apply a few layers of blue painter's tape to the approximate center on the top and the bottom.  
  2. measure, mark, and drill with a multi-purpose or wood bit.  we (hubby and i) determined drilling from the top leaves a cleaner hole on top.  drill holes in both plates. 
your mark should be the center of the plate.  this one was off-set.

don't worry about a few small chips. they'll likely be covered by a nut or coupler.


step two:
prepare your hardware.  

  1. eye bolts come in specific lengths, all which are too long for this project.  use a hack saw to cut it to length.  you'll want the threads to be about 1/2 the length of your coupler.  
  2. determine the distance you want between your plates.  add half the length of your coupler and the height of your nut (remember to account for the thickness of your plate). then saw the all thread to the proper length. if you're off by a fraction of an inch, no big deal...this measurement is forgiving.
  3. damage the threads on about an eighth of an inch at the end of your all thread by carefully tapping with a hammer.  this will keep the bottom nut from unscrewing. you could also add a drop or two of glue to keep them secure.   

this is my husband sawing the all thread; same procedure to use on the eye bolt.


step three:
assemble.


in this order from the bottom:  nut, plate, nut, coupler, coupler, nut, plate, coupler, eye bolt


2.  place the bottom plate on the all thread and work it all the way down to the nut. screw on a nut, followed by a coupler.  tighten them to hold the plate securely.

3.  screw on another coupler to the height where you want the top plate.  add a nut, then the top plate.  screw on another coupler.  you should have about half the threads left inside the coupler.

4.  tighten the couplers around the top plate.

5.  screw on the eye bolt and tighten.

the coupler and eye bolt after assembly.

step four
stabilize.

add rubber grips to the bottom so the tray will be level.  i guess they call them 'vinyl bumpers'.  these are nice and thick and adhesive.  they add stability to the tray as well.  i have been carefully hand washing and drying these trays to keep them looking beautiful.    


i picked these up at home depot.
and there you have it!  a do-it-yourself 'industrial' version of the super-popular tiered tray (for only around $10)!  


Todays Creative Blog

Tip Junkie handmade projects
Photobucket

Saturday, May 14, 2011

i dig on these...

what am i diggin' on right now?  

check 'em out.  
these are great!

shanty2chic shows us this quick and cute mason jar key hook.

i am so doing this...asap!  melamine and bling! rachel shows you how at bubbly nature creations.  


this one is for my minions, er, my kids....brandy's crafts demos this despicable treat!  


natty by design proves what a coat of white paint can do for an old china hutch!


Thursday, May 5, 2011

aprons, aprons, aprons...

i am so excited to show (off) the aprons i just finished!


i planned an afternoon photo shoot and a final 'good-bye' before i packed these sweeties up and sent them off to their new home in texas.  you can see that it was a bit windy that afternoon...these are the best shots.  the others were a big fail! at least i tried.    


i had grown attached to them, all 23 of them.  it was as if i was giving up my new puppy or something.  please someone tell me that i'm not the only one who has 'project attachment issues'! 


i customized each apron with the initial of the party guest.  they have elastic neck straps and a Velcro waist strap.  i normally make them with ric rac on the top and bottom, but the customer elected to leave that off.  


i love how they turned out.  and i had to throw in a pic of my model wearing one!


Tuesday, May 3, 2011

silhouette vinyl on MY wall...finally!

busy, busy, busy...we are all terribly busy with family, jobs, activities, volunteering, crafting, sewing, etc., you know the drill.  it's becoming my excuse, and i need to stop that!
 

as you know, i was recently inducted into the 'i own a silhouette sd and love it' club.  i also joined the 'mine came with 2 rolls of vinyl that i haven't had a chance to use until now' club.  ;)

in our front room, we already have 2 picture ledges (thank you, ikea), that were not overly interesting to look at...until now!


i know i'm not original [putting our family name in vinyl on our wall], but thought it was worth sharing.  :) 

Monday, May 2, 2011

apron progress...in photos...

(b/c i don't have time to write! eek!)

scraps...these might end up on a cheap pair of pink flip flops...

the apron panels...all cut and ready for assembly

more scraps...

the initials with a circle background (have i mentioned how much i love my silhouette?)

fabric tubes that are destined to be waist and neck straps (all 69 of them!)

i can't wait to show you the finished aprons...


Related Posts Plugin for WordPress, Blogger...