Showing posts with label gift. Show all posts

Sunday, January 13, 2013

Sharpie Oil-Based Marker Project

[let's take a break from house-building and do a little crafting...shall we?]


I love receiving handmade gifts and I love to give handmade gifts.  When you don't have time to create something from scratch, or when you want to make it extra special...personalize it!


These oil-based Sharpies make it so simple!  I ordered a 15 piece set from Amazon, but they are available in sets of 5 or individually at your local craft stores. Then I went shopping for some white ceramic serving pieces.  I found the most perfect options at TJMaxx for a reasonable price.  A serving tray and a small fluted bowl that matched. 

For the design, I knew I wanted to make old-school holiday lights.  They are timeless, modern, and little bit retro and so much fun!  I started by free-handing the bulbs, placing them in random angles but trying to keep a similar spacing between them.

Maeve wanted to help, so I watched while she drew the black squares at the base of each bulb.  She did a great job, huh?! And she's crazy cute with that look of concentration!


Caramel corn gives you crazy crafting powers, by the way.

Then just connect the light bases to one another to form the string of lights...adding a few loops, of course!


I used my Silhouette to cut some contact paper into a stencil to add the name to the tray and bowl.  And on the bottom I crossed out the "dishwasher safe" that was printed on the back and wrote, "hand wash me" and added the year as well.  You could also include your "To:" and "From:" on the back to further personalize! 


These markers do not indicate that they are food-safe.  I also could not find any instructions for 'setting' the paint.  Unsure, I put them into a cold oven.  Turned it on to 350 degrees and set the timer for 30 minutes.  Then turned the oven off, but leaving the tray & bowl inside until they cooled.  That took most of the afternoon.  


I knew these would be more of a display and maybe once a year would be filled with peanut m&ms and maybe some cookies, but I thought maybe setting the paint this way would give it a bit more life. 

Easily adapt this for any holiday - hearts, shamrocks, stars and stripes...of simply a name or monogram.  This would make a wonderful hostess gift as well!  

Pin It...to remember this project for next Christmas!


Tip Junkie

Sunday, November 27, 2011

make your own chenille - chevron style!


I didn't believe it would work.  In fact, I set out to prove it wrong.  I failed.  Not only did it work, it is awesomely soft, thick, and pretty. 


I am enjoying the chevron trend just as much as the next gal, so when I saw this tutorial at Aesthetic Nest, I had to give it a whirl (despite all the other projects I am supposed to be working on...).  So, to make myself feel better about my lack of self-discipline, I made just a mini version from her tutorial instead of the full baby blanket.  My little sample piece is more placemat size (but I love it just as much).

Before taking a ride in my washer and dryer.
It's so simple, it hurts!  Layer up some flannel (I used 5 layers of white and a top layer of this floral).  Sew along the zig zags.  Bind (packaged binding is good enough for me!).  Wash. Wait. Anxiously. Toss in dryer. Wait. Anxiously.  Enjoy your fluffy chevron-y prettiness!  
Is this a little foreshadowing of a future as a rug???

I am not sure what I'm going to do with my sample.  It's so pretty.  My mom came over, saw it and decided it'd make a great rug for under her dining room table. Crazy! But wait...that's not a bad idea.  It's soft underfoot (yes, I stepped on it), machine washable, and customizable to any decor!  I think my mom may be on to something...


 What do you think?  Would it make a nice rug?  Or am I out of my mind?


Wednesday, September 21, 2011

Will they like it??

It's one thing when your [insert obligated person here] tells you that they love the stuff you make.  My husband, my mom, my friends, my kids, etc.!  It's another when it comes from a stranger.  


I have been so happy/relieved/elated by the feedback I've gotten from my Etsy customers.  A few of them even talked about me and I wanted to shamelessly brag tell you about it: 


Christy at MCH Photography just featured my shop last week.


Go check it out.  She is lovely...and took some great pics (way better than my shop pics...mental note: update my pics!).


Jessica at Little Pumpkin Grace purchased three wristlets for teacher gifts for the start of school.


She even dressed them up in cute packaging...which inspired me to step up my packaging as well!
  
I don't know what it is about seeing something I made in another environment (i.e. not my sewing room)!  Love it!


Ladies, I *truly* appreciate the shout-outs.  It warms my heart.  Thank you. 

Sunday, September 18, 2011

Long live the Horsemen!

I am jealous of my husband and his college buddies.  They manage to take a trip together *every* year since we graduated.  


My girlfriends and I can barely scrape together a trip to save our lives. Pathetic.  (But I love and miss all of you to pieces.)


That's right, girls (Jenni, Me, Amber, Melissa)...see that date in the lower right?  2005!  Seriously?  Come on!  Oh, and excuse our 'dewiness'...it was June and no air conditioning there!


This year, the guys are meeting in the great state of Texas.  Dallas, to be exact.  One friend lives there and his wife is expecting twins (miss you MCB!) and he didn't want to be too far from home, so they are takin' the party to him.  Don't worry, his wife and their son are visiting her parents for the while.  


Circa spring 2000.  I claim the one in the lower right corner.  The gashes on his leg?  Previous night he was run over by a golf cart...don't ask.


The guys (who were nicknamed the Horsemen back in college (why?  I have no idea)) will be sporting these shirts made especially for them.  


They were super simple to design on the Silhouette software.  I chose a 'western-y' font called Coffee Tin from 1,001 free fonts


Remember:  Always mirror-image your design when using heat transfer vinyl.  Learned it the hard (wasteful) way.  Boo.


I use Siser Easy Weed heat transfer vinyl.  It is easy to work with and I've had great results.
  
Tip:  Use a seam ripper to weed your design (i.e. remove the vinyl you don't want).


I'd heard it was great for layering, so I gave it a try.  The symbol is called the Honor G. It's the athletic symbol for the college we all went to.


As legend has it, several became Horsemen, but there were just five original Horsemen.  And this year's trip turned out to be just those five.  So I thought it was fitting to add, "The Original Five".


By the way, they do have plans to visit the biggest honky tonk bar while they are there.  I can't wait to hear how that went.  


Horsemen, hope y'all love the shirts!  
Linkin' up here and at the others on my Linky Party Page!

Tuesday, September 13, 2011

Have I mentioned that I love my Silhouette?

I am in love.  With my Silhouette.  It is consistently ah-may-zing me with each new project.  I recently made cards on it.  Where has it been all my life?  I digress.

The first card was a birthday card for a gift that was ordered through my etsy shop.  The customer asked that it be shipped directly to the birthday girl and I included this card:

  
To create the card, I used two different files that came with my Silhouette.  I used the card with a scallop edge from one file and the happy birthday from another file.  Easy.

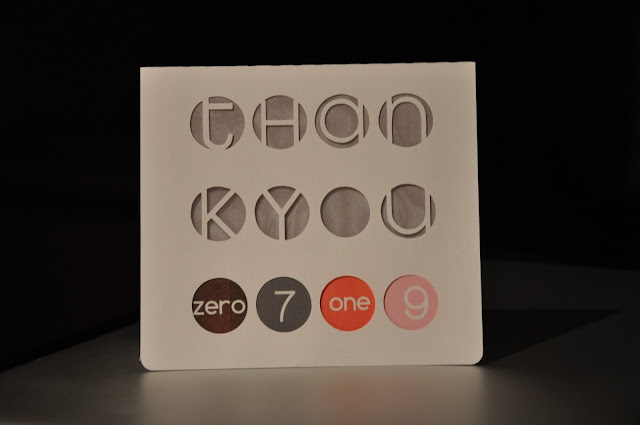
Now that I had some confidence in my card making...(ha!)...I decided to create a thank you card to include with a different order.  This one was designed around my shop's logo.  


It's just circles.  The bottom row of circles has my shop logo peeking through.  The top two rows say 'thank you', as if you needed me to spell it out.  Although my husband had trouble figuring out what it said...is it hard to read?  I liked how the "k" wraps around so the rows stay consistent and mimics the four circles in the logo.  What do you think?

And because I didn't want the inside writing to show through, I dug through my scrap pile and found a charcoal gray piece of sheer fabric, cut it to size, glued it to a piece of white card stock, then glued to whole thing to the back of the front flap.  In the pic below, you can see the shimmer of the sheer fabric. 

I swear, it looked better in person!  I hope the recipient thinks so, too!  

Monday, August 1, 2011

a simple skirt for maeve and the cousins

i get so much inspiration from the sewing blogs in blogland.  i especially love MADE.  dana has a ton of amazing tutorials.  i have read them all.  hadn't actually done any.  until now.


the simple skirt.  i like tutorials that contain the word *simple*.  off to a great start!


it really was simple!  she even gives you instructions for a double layered skirt for those of you who are daring.


it worked!  i made the simple skirt for my 5-year-old daughter maeve with a an adorable remnant i found at my local jo-ann's.  it was already cut at the perfect size; i straightened the edges and started sewing.  not too girly, light and airy, with kind of a slub texture.


i was so happy with how it turned out, i made three more so the cousins could match (luckily jo-ann's had more on the bolt).  only down side...my poor ethan, no skirt for him.  :(


i used store-bought double fold bias tape for the bottom hem in a dark gray, pink, and orange.  

the girl cousins in their matching skirts


she walked out on the dock with her hands behind her back like that...so cute!


my nieces...they loved their skirts (whew!)

a closer look at greta's tiny skirt


you might have noticed their matching shirts...more on those soon!


Todays Creative Blog

Saturday, June 18, 2011

more kanzashi satin flowers

the response to these folded satin flowers has been great! i am totally sold out of them!  thanks for all the nice words.  it makes me happy to know that people like the things i make. [insert smile here!].  


anyway,  i thought i'd show [off] a few more that i have done since then:


pretty piper modeling one on a headband


yay for orange!


with a leaf...


polka dot love


i call these 'spiky' (the ones above are 'loopy')...real technical terms here.   ;)


a monochromatic 'loopy' one worn as a brooch (by the fabulous jane k.)...she also clipped this to the handle of a purse for instant accessorization (is that a word?).  ha!


this one livens up gina's black cardigan


do you have a favorite?  
are you on "team loopy" or "team spiky"?
suggestions for other color-schemes?


Related Posts Plugin for WordPress, Blogger...