Showing posts with label silhouette. Show all posts

Sunday, January 13, 2013

Sharpie Oil-Based Marker Project

[let's take a break from house-building and do a little crafting...shall we?]


I love receiving handmade gifts and I love to give handmade gifts.  When you don't have time to create something from scratch, or when you want to make it extra special...personalize it!


These oil-based Sharpies make it so simple!  I ordered a 15 piece set from Amazon, but they are available in sets of 5 or individually at your local craft stores. Then I went shopping for some white ceramic serving pieces.  I found the most perfect options at TJMaxx for a reasonable price.  A serving tray and a small fluted bowl that matched. 

For the design, I knew I wanted to make old-school holiday lights.  They are timeless, modern, and little bit retro and so much fun!  I started by free-handing the bulbs, placing them in random angles but trying to keep a similar spacing between them.

Maeve wanted to help, so I watched while she drew the black squares at the base of each bulb.  She did a great job, huh?! And she's crazy cute with that look of concentration!


Caramel corn gives you crazy crafting powers, by the way.

Then just connect the light bases to one another to form the string of lights...adding a few loops, of course!


I used my Silhouette to cut some contact paper into a stencil to add the name to the tray and bowl.  And on the bottom I crossed out the "dishwasher safe" that was printed on the back and wrote, "hand wash me" and added the year as well.  You could also include your "To:" and "From:" on the back to further personalize! 


These markers do not indicate that they are food-safe.  I also could not find any instructions for 'setting' the paint.  Unsure, I put them into a cold oven.  Turned it on to 350 degrees and set the timer for 30 minutes.  Then turned the oven off, but leaving the tray & bowl inside until they cooled.  That took most of the afternoon.  


I knew these would be more of a display and maybe once a year would be filled with peanut m&ms and maybe some cookies, but I thought maybe setting the paint this way would give it a bit more life. 

Easily adapt this for any holiday - hearts, shamrocks, stars and stripes...of simply a name or monogram.  This would make a wonderful hostess gift as well!  

Pin It...to remember this project for next Christmas!


Tip Junkie

Monday, January 16, 2012

Sweep it under the proverbial rug...

My crafting and sewing has seemingly taken over the house.  The ugliest of which is in our dining area.  Right between the kitchen and the living room.  Translation: where everyone can see it.  It's so convenient to have it close to the table when I drag it all out, but it's not pretty.  So I finally did something about it. 


What?! That before and after didn't knock you off your chair???  I'm still on mine as well.  I would have liked it to hide a bit more.  But I used what I had on hand.  It turned out to be more of a distraction than a cover up.  :)  This area is such a high traffic area because it's a pass through to the living room.


It's a vast improvement over that (above)!  And the worst part...I didn't even bother emptying the cabinet before I started piling my stuff in it.  


This is the first time I've run plain ol' contact paper through the Silhouette.  It worked best on these SD settings:

  • speed: 10 
  • thickness:1 
  • blue blade cap  

I used transparent contact paper that I already had (bought at Target). If I had frosted, I would've used it instead. Then cut it to fit my Silhouette SD and fed it in (without the cutting mat).  The new Silhouette Cameo's 12" cutting width would've made this project a breeze.  Instead, with my SD, I had to cut three 9" sheets for each door and line them up with each other.  Well worth the effort though!


I organized inside the cabinet, too.  Put the china in a safer place, but still using the crystal bowl to hold miscellaneous stuff.  I knew I registered for that for a reason. Ha!


Here's a better look at the contact paper circles.


This pattern of interlocking circles came on a CD with my Silhouette SD, but you could use any pattern you can find a .jpg of by Googling (or on Lougle - for any Hot Tub Time Machine fans out there!).  


That is the beauty of the Silhouette...there's an easy "trace" function that can help you transform your design (or a 'borrowed' one) into a cutable file.  It works best with black and white line drawings.  

Here's a quick tip to filtering your results on Google, if you didn't already know:

In this example, I've searched for "interlocking circles pattern" and these are the initial results.  Let's narrow this down.


The left-hand menu gives you options for filtering.  First, select "Images".  This filter will give you just the images that match your search criteria.  


Then filter one more time by "Line Drawing" to make your search for the perfect file even easier:


There are a ton of free clip art-type images out there...just waiting to be made into something beautiful (or to disguise something not-so-beautiful in my case)! 
Tip Junkie handmade projects Todays Creative Blog

Sunday, September 18, 2011

Long live the Horsemen!

I am jealous of my husband and his college buddies.  They manage to take a trip together *every* year since we graduated.  


My girlfriends and I can barely scrape together a trip to save our lives. Pathetic.  (But I love and miss all of you to pieces.)


That's right, girls (Jenni, Me, Amber, Melissa)...see that date in the lower right?  2005!  Seriously?  Come on!  Oh, and excuse our 'dewiness'...it was June and no air conditioning there!


This year, the guys are meeting in the great state of Texas.  Dallas, to be exact.  One friend lives there and his wife is expecting twins (miss you MCB!) and he didn't want to be too far from home, so they are takin' the party to him.  Don't worry, his wife and their son are visiting her parents for the while.  


Circa spring 2000.  I claim the one in the lower right corner.  The gashes on his leg?  Previous night he was run over by a golf cart...don't ask.


The guys (who were nicknamed the Horsemen back in college (why?  I have no idea)) will be sporting these shirts made especially for them.  


They were super simple to design on the Silhouette software.  I chose a 'western-y' font called Coffee Tin from 1,001 free fonts


Remember:  Always mirror-image your design when using heat transfer vinyl.  Learned it the hard (wasteful) way.  Boo.


I use Siser Easy Weed heat transfer vinyl.  It is easy to work with and I've had great results.
  
Tip:  Use a seam ripper to weed your design (i.e. remove the vinyl you don't want).


I'd heard it was great for layering, so I gave it a try.  The symbol is called the Honor G. It's the athletic symbol for the college we all went to.


As legend has it, several became Horsemen, but there were just five original Horsemen.  And this year's trip turned out to be just those five.  So I thought it was fitting to add, "The Original Five".


By the way, they do have plans to visit the biggest honky tonk bar while they are there.  I can't wait to hear how that went.  


Horsemen, hope y'all love the shirts!  
Linkin' up here and at the others on my Linky Party Page!

Tuesday, September 13, 2011

Have I mentioned that I love my Silhouette?

I am in love.  With my Silhouette.  It is consistently ah-may-zing me with each new project.  I recently made cards on it.  Where has it been all my life?  I digress.

The first card was a birthday card for a gift that was ordered through my etsy shop.  The customer asked that it be shipped directly to the birthday girl and I included this card:

  
To create the card, I used two different files that came with my Silhouette.  I used the card with a scallop edge from one file and the happy birthday from another file.  Easy.

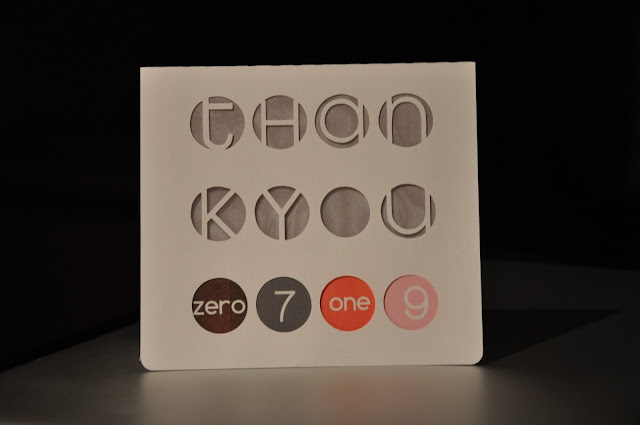
Now that I had some confidence in my card making...(ha!)...I decided to create a thank you card to include with a different order.  This one was designed around my shop's logo.  


It's just circles.  The bottom row of circles has my shop logo peeking through.  The top two rows say 'thank you', as if you needed me to spell it out.  Although my husband had trouble figuring out what it said...is it hard to read?  I liked how the "k" wraps around so the rows stay consistent and mimics the four circles in the logo.  What do you think?

And because I didn't want the inside writing to show through, I dug through my scrap pile and found a charcoal gray piece of sheer fabric, cut it to size, glued it to a piece of white card stock, then glued to whole thing to the back of the front flap.  In the pic below, you can see the shimmer of the sheer fabric. 

I swear, it looked better in person!  I hope the recipient thinks so, too!  

Monday, August 22, 2011

don't tell the NFL...

there aren't many things that will excite an 8 year old boy.  star wars. pokemon. sports. food. video games. dirt.  okay, so there are a few things.   

here's another to add to the list:  a personalized water bottle!    


he asked for his name and a football.  so in typical overachiever form, this is what i produced.  (wink)

due to 8 years of brainwashing by his father, he is a devout minnesota vikings fan, so this was perfect.  it only would have been better if i added a green bay packer logo with a huge line through it.  (my apologies to the readers who are packer fans -- i love brett favre, if it's any consolation).

the font is supposed to look like star wars.  i got it on one of the free font websites.  i think the font is called "star jedi".  there is also one called "jedi" that is similar.  both would be perfect for any star wars themed anything...and perfect for the budget as well! 

so, $3.99 for the water bottle from target (purple, of course), a scrap piece of vinyl, and my trusted silhouette sd, i successfully impressed an 8 year old!

Monday, July 25, 2011

a snarky glass etching tutorial

here's a little background on this to paint the picture for you.  
setting:  a meeting in a conference room at work
characters:  

  • chris (getting married that weekend)
  • tim (an *ever-so-slightly* bitter recent divorcee)
  • the rest of us  

tim, unaware of chris' upcoming nuptials, was venting a bit about the division of things in his divorce.  all the pots and pans stayed with his ex-wife, among many other items of basic living.  when it was pointed out to tim that chris was getting married on saturday, he gave the following marriage, er...divorce, advice to the groom-to-be:  "put your name on everything".  it was all in good fun, though.


and because we think we are funny, this is what we gifted later that week at chris' at-work wedding shower:


here's how we did it. 


supplies:
pyrex glass pan (size of your choice)
glass etching cream (available at craft stores)
contact paper or vinyl
silhouette or other craft cutter (or an exacto knife)


step one:
create your design either with software or freehand and then cut it.  *you have to mirror image this*.  remove the vinyl from the design that you want to show as etched glass (see mine in black vinyl in upper left corner).  also prep your glass by washing with soap and water. dry thoroughly. 


apply mirror imaged design to the bottom of the pan (not inside)

  
step two:
apply the vinyl to the bottom of your glass pan using transfer paper. be sure it is straight! 


haven't peeled away the transfer paper yet.

with transfer paper removed.  ready for etching cream.  
step three:
add etching cream following the directions on the bottle.  i was lucky enough to have a friend at work who had some at home already so i didn't have to buy any.


here he is...carefully applying the etching cream. 
tip:  do not get cream on your hands or anywhere on the glass that you do not want etched.  this stuff is fast-acting!  wear gloves, if you have them.  apply scraps of vinyl or contact paper around your design to prevent disasters.

yes, the 1's in 2011 are little forks.  :)

completely covered in a 'thick layer'.

step four: 
wait.  (follow directions on your etching cream - ours took 5 minutes). 

step five:
wash!

tip:  glass etching cream can be reused...so carefully scrape off what you can (without smearing any on the glass outside of your design) and put it back in the bottle for next time.  

put on your gloves and rinse the pan clean under running water.  dry it and check to see if your glass is etched to your liking.  if not, reapply etching cream and repeat steps 3, 4, and 5.  we were happy with our results; no reapplication needed!

step six: 
the reveal!  remove the vinyl or contact paper. 


there you have it: a personalized, albeit, slightly inappropriate wedding shower gift!


(btw, chris is a great sport and he absolutely appreciated the humor in our gift!)
  
Todays Creative Blog
Related Posts Plugin for WordPress, Blogger...